•  
    Page 1 of 2 12 LastLast
    Results 1 to 10 of 13

    Thread: How to replace the rear brake shoes (pads)

    1. #1
      Almost time to do my timing belt xintersecty's Avatar
      Join Date
      Sep 2010
      Location
      West Union, SC
      Posts
      1,687
      Thanks
      86
      Thanked 181 Times in 156 Posts

      How to replace the rear brake shoes (pads)

      OK here is the picture tutorial on replacing the pads.

      Removing the drums varies. Here is a link to removing the drums off my car 2006 aveo:
      http://www.aveoforum.com/forum/f85/r...06-aveo-16131/

      0) New pads and the drums removed. Jacking under the rear axle beam is a good spot to pick the entire rear of the car. Assuming no bleeding needed.

      1) Use the pad with the e-brake and flip up the brake lever like so:
      Name:  2014-04-12 16.54.37.jpg
Views: 31012
Size:  295.3 KB

      Using two pliers pull the spring away and the cable towards you, then use the magic of your feet to maneuver the attachment point onto the cable.
      Name:  2014-04-12 16.55.18.jpg
Views: 26268
Size:  294.1 KB

      Rotate the brake pad in place with the e-brake behind the brake pad.
      Name:  2014-04-12 16.55.29.jpg
Views: 38579
Size:  302.1 KB

      Put the retaining pin and spring onto the pad for the e-brake pad.
      Name:  2014-04-12 16.58.14.jpg
Views: 28301
Size:  304.4 KB

      Mount the adjuster with the tooth out and gear towards the front. Pay attention there is LH and RH stamped into the metal. The gear teeth are situated to rotate down towards the outside. Again a picture is worth a thousand words.
      Name:  2014-04-12 17.00.21.jpg
Views: 29887
Size:  301.0 KB

      Mount the bottom spring onto the e-bake pad and onto the front pad. This has to be done at this stage otherwise you will NEVER be able to stretch that spring into place.
      Name:  2014-04-12 17.00.27.jpg
Views: 26583
Size:  297.1 KB

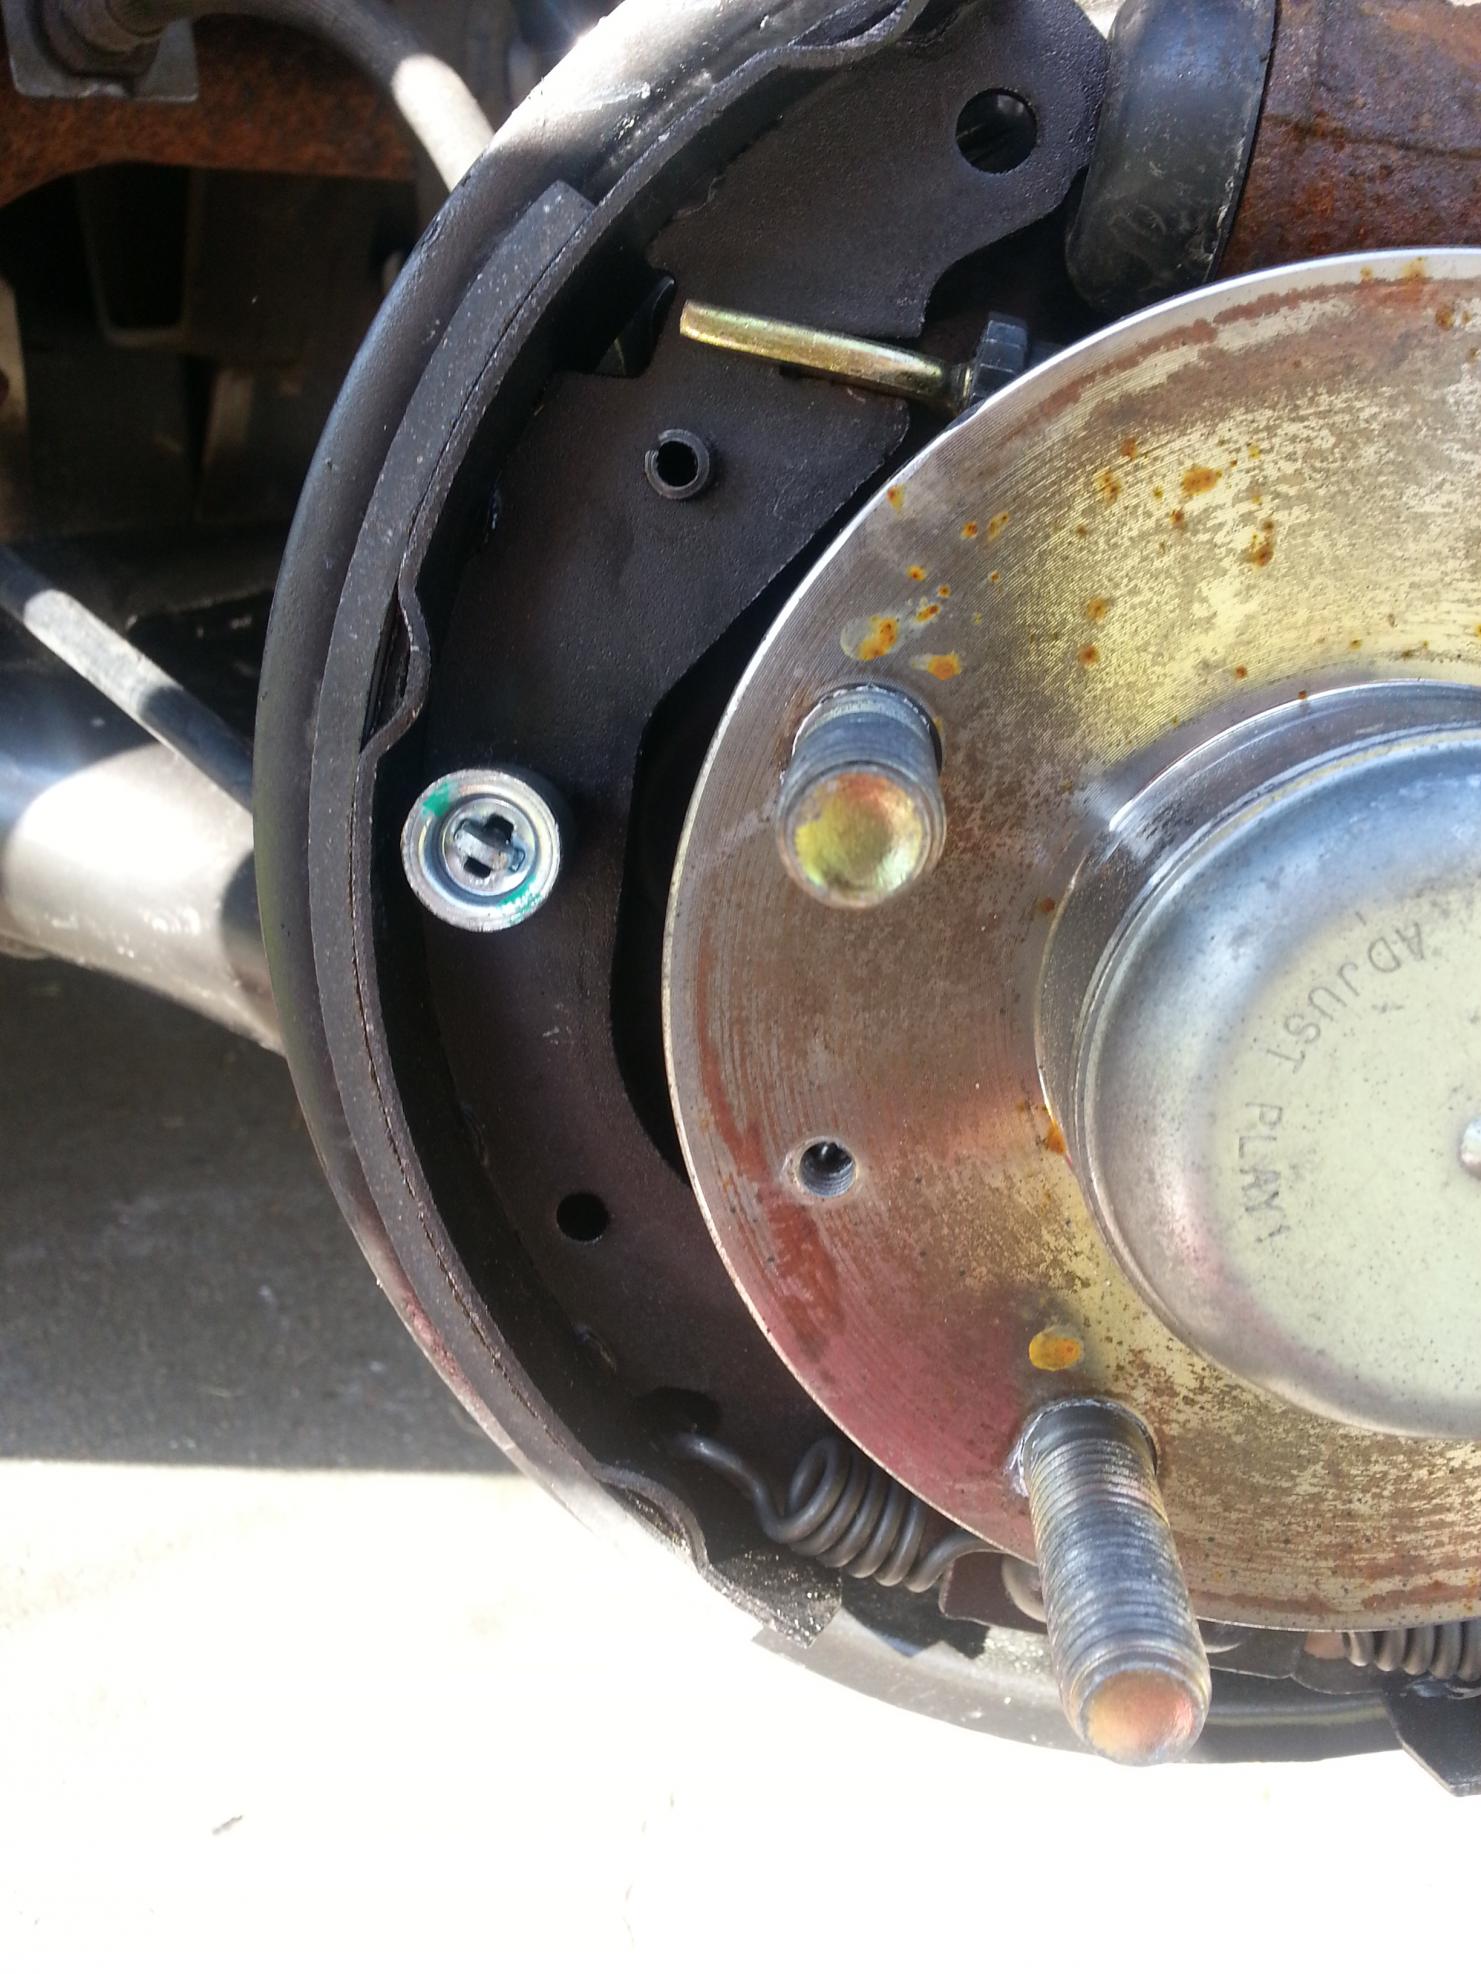
      Rotate the pad into place; the bottom spring will kinda keep it there. Mount the retaining pin and spring.
      Name:  2014-04-12 17.06.12.jpg
Views: 27125
Size:  289.1 KB


      Last edited by xintersecty; 04-17-2014 at 03:21 AM.
      Please do not power off, firmware update pending.....

    2. The Following User Says Thank You to xintersecty For This Useful Post:

      Daox (11-17-2015)

    3. #2
      Almost time to do my timing belt xintersecty's Avatar
      Join Date
      Sep 2010
      Location
      West Union, SC
      Posts
      1,687
      Thanks
      86
      Thanked 181 Times in 156 Posts
      Part II

      Now it's time to put the auto adjuster together. I start off with the adjuster at the smallest setting. Later this is useful for putting on the springs. Not the pin just under the adjuster. That is where the tooth grabber goes. (ok, I don't know what else to call it! )
      Name:  2014-04-12 17.06.15.jpg
Views: 27417
Size:  277.8 KB

      Put the tooth grabber onto the pin.
      Name:  2014-04-12 17.10.03.jpg
Views: 24899
Size:  287.2 KB

      Slide the spring clip thingy onto the pin and the top hole.
      Name:  2014-04-12 17.10.20.jpg
Views: 28673
Size:  286.6 KB

      Place the top spring onto the spring clip thingy and the e-brake pad.
      Name:  2014-04-12 17.11.54.jpg
Views: 40054
Size:  297.8 KB

      Place the adjuster spring onto the tooth grabber and bottom hole of the front pad.
      Name:  2014-04-12 17.12.47.jpg
Views: 47663
Size:  295.9 KB

      Before doing anything else. Back off the adjuster in the e-brake in the cabin.
      Name:  2014-04-16 19.06.18.jpg
Views: 24412
Size:  296.4 KB

      Move the adjuster downwards until you have a couple of threads showing. Remember to test fit the hub onto your assembly. You want to get it where the wheel just barely moves.
      Name:  2014-04-16 18.53.24.jpg
Views: 26181
Size:  293.4 KB

      Button up everything and enjoy!

      I almost forgot something. I just took the pictures of wrote up the instructions. I want to thank other members with their golden nuggets of advice from other threads. After all this forum succeeds because we work together as a collective.
      Last edited by xintersecty; 04-17-2014 at 10:58 AM.
      Please do not power off, firmware update pending.....

    4. The Following 3 Users Say Thank You to xintersecty For This Useful Post:

      Daox (11-17-2015),moonrunner1972 (12-28-2015),samtech (02-27-2017)

    5. #3
      Almost time to do my timing belt
      Join Date
      Aug 2012
      Location
      Northeast
      Posts
      1,409
      Thanks
      3
      Thanked 103 Times in 94 Posts
      Very nice write-up and pictures. Thanks for putting the time and effort into posting this information. I'm sure it will help others in the future

    6. #4
      What's wrong with my car?
      Join Date
      Jun 2013
      Location
      San Francisco Bay Area
      Posts
      20
      Thanks
      13
      Thanked 2 Times in 1 Post

      Question

      Xintersecty,
      Thanks very much for posing and gathering all of this valuable information and taking such amazing pictures.
      As it turns out, the timing couldn’t be better for me, I will be changing my original brakes shoes and leaking wheel cylinders this weekend.
      Your efforts are so very much appreciated!
      I have a question however, does the adjustment to the parking brake need to be performed? Did you discover that it was a must before proceeding?

      Here’s my logic, I’m sure my car’sparking brake has never been adjusted and with new shoes installed would the slack be picked up by virtue of the new shoes? Would the cable have stretch that much to merit this additional step?
      Please don’t take my inquisitiveness as questioning your technique, I simply do not know and would like to hear your input since you have more experience.

      Thanks again for your help!

    7. #5
      Almost time to do my timing belt xintersecty's Avatar
      Join Date
      Sep 2010
      Location
      West Union, SC
      Posts
      1,687
      Thanks
      86
      Thanked 181 Times in 156 Posts
      I looked at the adjustment for the parking brake at the handle. It really did not need much adjustment. So that got left alone.
      Please do not power off, firmware update pending.....

    8. #6
      What's wrong with my car?
      Join Date
      Jun 2013
      Location
      San Francisco Bay Area
      Posts
      20
      Thanks
      13
      Thanked 2 Times in 1 Post
      Thanks again for your support andlighting quick response, may you have fantastic day!!

    9. #7
      Should I keep it? Merlins_Holden's Avatar
      Join Date
      Sep 2013
      Location
      Columbia River Gorge, WA
      Posts
      75
      Thanks
      0
      Thanked 5 Times in 5 Posts
      This is going to be useful, my Aveo certainly will need this done soon (along with the front too) as I am nearly at 100,000 miles with brakes having been done only once (or so it seems), still brakes fine!

      Thanks.

    10. #8
      What's wrong with my car?
      Join Date
      Mar 2014
      Location
      apison, tn
      Posts
      18
      Thanks
      0
      Thanked 2 Times in 2 Posts
      I did this today on my 07 aveo sedan! I have one more tip for u:

      Use a LARGE C Clamp to hold the brake shoe up while you put the retainingcup, pin, and spring together.
      This is VERY helpful on both shoes as they like to move around as you only have 2 hands to work with!

      Thanks again for the pics ans instructions!!

    11. The Following User Says Thank You to john_johnson For This Useful Post:

      xintersecty (12-30-2016)

    12. #9
      Should I keep it?
      Join Date
      Nov 2016
      Location
      Chicago
      Posts
      74
      Thanks
      0
      Thanked 5 Times in 5 Posts
      I agree with John. I did rear shoes a few days ago and used a c clamp as well.

      Also, if you are replacing wheel cylinders the lines will come out without damage if you have patience. It took me about a day per wheel cylinder/shoe, but I didn't want to chase lines up to the front of the car knowing my luck, so it had to come out at the fitting. It probably would have been smarter to work at both lines in the same day, but it was too cold.

      Basically what I did at first was spray the fittings with Kroil (or PB) and let it sit overnight. Then on each side I pulled the bleeder out with a six point socket and got on the fitting with Irwin 4LW Vise Grip pliers. Slowly work the fitting back and forth. Maybe a few light/medium taps here and there with a rubber mallet. Then occasionally I would switch to the flare nut wrench, just to maybe give it a little different force. The pliers/wrench will slide on the nut slightly, but if you're gentle it will not round the nut. Continue to spray the lubricant on the fitting. I wasn't having luck the first day, so again I let it sit overnight with the Kroil on it. This may have been the key. Put the bleeder back in obviously. The next day I again worked with the Vise Grips until at some point I felt the fitting tighten. This is the important here, the line tightened first, I doubt it would have loosened first. Then once it tightened I got the flare nut wrench on the line, soaked it with Kroil, and worked the fitting back and forth until it came free. Both flare nuts had a little bit of rounding damage from the force, they won't come out perfect, but still were square enough to loosen and tighten the fittings without issue. If they need to come out again in 100k miles then the lines will have to come out anyways. I hit them with black spray paint because the protective covering was starting to peel in places.

    13. The Following User Says Thank You to gingerdyde For This Useful Post:

      xintersecty (12-30-2016)

    14. #10
      Almost time to do my timing belt xintersecty's Avatar
      Join Date
      Sep 2010
      Location
      West Union, SC
      Posts
      1,687
      Thanks
      86
      Thanked 181 Times in 156 Posts
      Quote Originally Posted by john_johnson View Post
      Use a LARGE C Clamp to hold the brake shoe up while you put the retainingcup, pin, and spring together. This is VERY helpful on both shoes as they like to move around as you only have 2 hands to work with!
      Thanks for that tidbit. I will use a C-Clamp to hold the shoes in place.


      Please do not power off, firmware update pending.....

    Page 1 of 2 12 LastLast

    Similar Threads

    1. Replies: 1
      Last Post: 12-17-2013, 08:06 PM
    2. Replace Brake Pads and Shocks on Rear Wheels
      By mrneonshuffle in forum Wheels, Tires, Brakes & Suspension
      Replies: 6
      Last Post: 12-08-2013, 03:16 PM
    3. Almost 100k on original brake pads..
      By DailyDriverMark in forum General Discussion
      Replies: 6
      Last Post: 11-14-2011, 03:16 AM
    4. Rear Brake Shoes Dragging - Need Replacement
      By whitefish in forum Troubleshooting and Maintenance
      Replies: 1
      Last Post: 05-17-2010, 12:05 PM
    5. EBC Brake pads
      By khan4rtist in forum Wheels, Tires, Brakes & Suspension
      Replies: 1
      Last Post: 03-26-2009, 07:23 PM

    Tags for this Thread

    Posting Permissions

    • You may not post new threads
    • You may not post replies
    • You may not post attachments
    • You may not edit your posts
    •