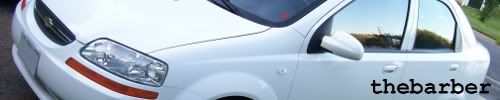
Red Max

Re: Red Max
Hey Lars
A question to ask here, how did you go about doing up the panels of your doors? I love those red trims you added to the doors.
Thanks for answering.
A question to ask here, how did you go about doing up the panels of your doors? I love those red trims you added to the doors.
Thanks for answering.
Forgive your enemies, but never, never forget their names.
- John F. Kennedy

- John F. Kennedy
-
WOLFMAN AK907

- Posts: 1008
- Joined: Sat Sep 12, 2009 2:38 am
- Location: Fairbanks, Alaska
- Contact:
Re: Red Max
sgmlim wrote:Hey Lars
A question to ask here, how did you go about doing up the panels of your doors? I love those red trims you added to the doors.
Thanks for answering.
Haha, I knew at least one of you would come over from SG.
Farthest North Aveo: Fairbanks, Alaska

Re: Red Max
I use to work for TMMC, as Quolity Control. Door and seats were my project, so I have riped a few appart over the years. I have a post in how to do it for the doors. If your in town I can even show you.
-
WOLFMAN AK907
- Posts: 1008
- Joined: Sat Sep 12, 2009 2:38 am
- Location: Fairbanks, Alaska
- Contact:
Re: Red Max
LarsBud wrote:I use to work for TMMC, as Quolity Control. Door and seats were my project, so I have riped a few appart over the years. I have a post in how to do it for the doors. If your in town I can even show you.
He's in Singapore.
Farthest North Aveo: Fairbanks, Alaska
Re: Red Max
Ok I'm not just around the corner, but I always have cold beer:)
Re: Red Max
Door-panel Makeover:
Lots of people out there are painting their interiors these days, but I am a little more old school so I have opted to go with vinyl.
I am staying with the Red and Black theme for Red Max.
Using Vinyl does require you to tare the door panels down to the individual components, but at the end you have a factory finish.
I have added a few pick of the rework. It took me 6 hours to do the job, but I do have training in door and seatwork. This is something that does require time and planning if you are a first timer.


After you remove the door panels flip them around. All the work to take them apart is done from the backside.
You will need a screwdriver and a sharp chisel.
A package of short crews with wide flat heads and washers.
Contact cement and a paintbrush, don’t use the spray on type unless you can get factory quality glue. For the stuff you by in stores will come loose in a month or two.
Test the glue on a scrap piece of material to see if it bleeds through. The mesh needs to be very tight or you will need a backing.
Work on only one door piece at a time and start on a back door. So when you make any small mistakes you want see them. You probably will on the first door you try.
Now to take the door panel apart you will find a combination of screws and sonic welds holding it together. This is where you need a chisel, to cut the tops of the weld off. You can also use a drill to plunge the heads off, but be careful not to go deep or you want get it back together.
One you have the parts all separate you can cut your patterns using the parts. Always leave enough material to wrap it around the edges.
Apply glue to both door part and material, make sure not to have lump or globs for this will show through. You will need to make sure you have glue also around the edges of the backside for the wrap. Let the pieces dry and them apply carefully. Start from one end and work across the part, work it smooth and wrap extra material around edges.
After doing all parts you will need to re-assemble, this is where the screws you bought come into play. You will screw them into the nipples of the sonic welds. You will need to place washers under the screw heads to prevent them from coming through the door. You will need to be very careful or you will have a screw come through your door, also be careful not to over tighten the screws. For they can strip out easily.
Repeat until you have finished.
That’s it in a nutshell!
Lots of people out there are painting their interiors these days, but I am a little more old school so I have opted to go with vinyl.
I am staying with the Red and Black theme for Red Max.
Using Vinyl does require you to tare the door panels down to the individual components, but at the end you have a factory finish.
I have added a few pick of the rework. It took me 6 hours to do the job, but I do have training in door and seatwork. This is something that does require time and planning if you are a first timer.
After you remove the door panels flip them around. All the work to take them apart is done from the backside.
You will need a screwdriver and a sharp chisel.
A package of short crews with wide flat heads and washers.
Contact cement and a paintbrush, don’t use the spray on type unless you can get factory quality glue. For the stuff you by in stores will come loose in a month or two.
Test the glue on a scrap piece of material to see if it bleeds through. The mesh needs to be very tight or you will need a backing.
Work on only one door piece at a time and start on a back door. So when you make any small mistakes you want see them. You probably will on the first door you try.
Now to take the door panel apart you will find a combination of screws and sonic welds holding it together. This is where you need a chisel, to cut the tops of the weld off. You can also use a drill to plunge the heads off, but be careful not to go deep or you want get it back together.
One you have the parts all separate you can cut your patterns using the parts. Always leave enough material to wrap it around the edges.
Apply glue to both door part and material, make sure not to have lump or globs for this will show through. You will need to make sure you have glue also around the edges of the backside for the wrap. Let the pieces dry and them apply carefully. Start from one end and work across the part, work it smooth and wrap extra material around edges.
After doing all parts you will need to re-assemble, this is where the screws you bought come into play. You will screw them into the nipples of the sonic welds. You will need to place washers under the screw heads to prevent them from coming through the door. You will need to be very careful or you will have a screw come through your door, also be careful not to over tighten the screws. For they can strip out easily.
Repeat until you have finished.
That’s it in a nutshell!
Re: Red Max
LarsBud wrote:Door-panel Makeover:
Lots of people out there are painting their interiors these days, but I am a little more old school so I have opted to go with vinyl.
I am staying with the Red and Black theme for Red Max.
Using Vinyl does require you to tare the door panels down to the individual components, but at the end you have a factory finish.
I have added a few pick of the rework. It took me 6 hours to do the job, but I do have training in door and seatwork. This is something that does require time and planning if you are a first timer.
After you remove the door panels flip them around. All the work to take them apart is done from the backside.
You will need a screwdriver and a sharp chisel.
A package of short crews with wide flat heads and washers.
Contact cement and a paintbrush, don’t use the spray on type unless you can get factory quality glue. For the stuff you by in stores will come loose in a month or two.
Test the glue on a scrap piece of material to see if it bleeds through. The mesh needs to be very tight or you will need a backing.
Work on only one door piece at a time and start on a back door. So when you make any small mistakes you want see them. You probably will on the first door you try.
Now to take the door panel apart you will find a combination of screws and sonic welds holding it together. This is where you need a chisel, to cut the tops of the weld off. You can also use a drill to plunge the heads off, but be careful not to go deep or you want get it back together.
One you have the parts all separate you can cut your patterns using the parts. Always leave enough material to wrap it around the edges.
Apply glue to both door part and material, make sure not to have lump or globs for this will show through. You will need to make sure you have glue also around the edges of the backside for the wrap. Let the pieces dry and them apply carefully. Start from one end and work across the part, work it smooth and wrap extra material around edges.
After doing all parts you will need to re-assemble, this is where the screws you bought come into play. You will screw them into the nipples of the sonic welds. You will need to place washers under the screw heads to prevent them from coming through the door. You will need to be very careful or you will have a screw come through your door, also be careful not to over tighten the screws. For they can strip out easily.
Repeat until you have finished.
That’s it in a nutshell!
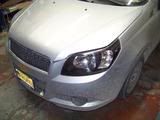
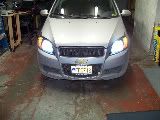
Hi Lars,
Thanks for the heads up.. I did strip my doors apart and did some carbon fibre wrap on it. Things went well and I will try changing it to red vinyl later. =)
Here are some pics:
- Attachments
-
- 14112009143.jpg
- CF on door panels
- (9.4 KiB) Downloaded 422 times
-
- 14112009135.jpg
- Process of doing.
- (11.47 KiB) Downloaded 422 times
-
- 14112009136.jpg
- Close up
- (10.91 KiB) Downloaded 422 times
Forgive your enemies, but never, never forget their names.
- John F. Kennedy
- John F. Kennedy
Re: Red Max
LarsBud wrote:Door-panel Makeover:
Lots of people out there are painting their interiors these days, but I am a little more old school so I have opted to go with vinyl.
I am staying with the Red and Black theme for Red Max.
Using Vinyl does require you to tare the door panels down to the individual components, but at the end you have a factory finish.
I have added a few pick of the rework. It took me 6 hours to do the job, but I do have training in door and seatwork. This is something that does require time and planning if you are a first timer.
After you remove the door panels flip them around. All the work to take them apart is done from the backside.
You will need a screwdriver and a sharp chisel.
A package of short crews with wide flat heads and washers.
Contact cement and a paintbrush, don’t use the spray on type unless you can get factory quality glue. For the stuff you by in stores will come loose in a month or two.
Test the glue on a scrap piece of material to see if it bleeds through. The mesh needs to be very tight or you will need a backing.
Work on only one door piece at a time and start on a back door. So when you make any small mistakes you want see them. You probably will on the first door you try.
Now to take the door panel apart you will find a combination of screws and sonic welds holding it together. This is where you need a chisel, to cut the tops of the weld off. You can also use a drill to plunge the heads off, but be careful not to go deep or you want get it back together.
One you have the parts all separate you can cut your patterns using the parts. Always leave enough material to wrap it around the edges.
Apply glue to both door part and material, make sure not to have lump or globs for this will show through. You will need to make sure you have glue also around the edges of the backside for the wrap. Let the pieces dry and them apply carefully. Start from one end and work across the part, work it smooth and wrap extra material around edges.
After doing all parts you will need to re-assemble, this is where the screws you bought come into play. You will screw them into the nipples of the sonic welds. You will need to place washers under the screw heads to prevent them from coming through the door. You will need to be very careful or you will have a screw come through your door, also be careful not to over tighten the screws. For they can strip out easily.
Repeat until you have finished.
That’s it in a nutshell!
WOLFMAN AK907 wrote:sgmlim wrote:Hey Lars
A question to ask here, how did you go about doing up the panels of your doors? I love those red trims you added to the doors.
Thanks for answering.
Haha, I knew at least one of you would come over from SG.Welcome.
Thanks WOLF!
Forgive your enemies, but never, never forget their names.
- John F. Kennedy
- John F. Kennedy
-
WOLFMAN AK907
- Posts: 1008
- Joined: Sat Sep 12, 2009 2:38 am
- Location: Fairbanks, Alaska
- Contact:
Re: Red Max
sgmlim wrote:Thanks WOLF!
No problem buddy. Please contribute info on mods from your side of the world if you would. We're always interested in anything Aveo.
Farthest North Aveo: Fairbanks, Alaska
Who is online
Users browsing this forum: No registered users and 1 guest