Getting the fluid level under control was quite the challenge. Turns out you have to EXACTLY follow the instructions in the manual for measuring ATF. Drive around for 20km to warm up the engine. Park the car on a level surface. While the car is on, cycle through each gear from P to 1 and back to P, waiting a couple of seconds in between each gear. Only then can you go and pull the dipstick, clean it, and measure the fluid level. After doing this about three times and draining fluid, I finally got the level down to the maximum on the dipstick. I clearly had way too much in there. Doing all of the steps listed above makes the fluid really stand out on the dipstick.
Next think I did was fix the rear-left turn signal not turning on sometimes. I found that this problem was very intermittent, and may or may not correlate with the amount of rain. By disconnecting the connector going to that unit (found behind the carpet) and measuing with a multi-meter, I found that there was in fact 12V being delivered to the bulb. The bulb was in good condition, so it was most likely the wiring or the connection. I ended up giving the lightbulb connections a good sanding, and sealing up the connections with some silicone grease. This fixed the issue. Also; I read about getting the rear lights off and I have some advice for anyone wanting to do the same. There’s technically two bolts and two “clips” holding the unit in place. In order to get the clips off, all you need to do is gently shake the unit left and right until it comes out. Don’t pry on the clips or you will break them. The unit does hold on well with only one clip though. What I found odd was how the drainage worked on the hatchback. Any rain from the roof seems to purposely pour down very close to the headlight unit and through the bumper?? What a strange design choice. Doesn’t seem like it leads to much rust oddly enough.
Another issue I addressed was a loose passenger door handle. One of the bolts had come off. Thankfully after taking off the panel with this tutoral: https://www.youtube.com/watch?v=ip5pEf0R4DM I found the bolt dangling inside. All I had to do was put it back into the door handle; but this time I added some blue locktite. I didn’t find a good source on how to take off the mirror trim. I found that a 12mm wrench is perfect for this!
I attempted to take off the rear drums to inspect the shoes. After a lot of hammering I realized that I had the older-version drum brakes, where the drum and studs were a single unit, and where you have to take off the axle nut to remove the drums. So I was basically banging a hammer on the bearings. Oops! I ordered a 1 1/14” impact socket (I read that a 32mm works as well) and I’m waiting for that to arrive. Don’t make the same mistake I did!
And lastly I researched the crankcase ventilation system and how it worked. I learned that a faulty PCV valve can cause build-up in the engine. I don’t think my engine has much buildup, but it certainly isn’t squeaky clean by any means. The PCV valve is a cheap part, but I didn’t want to make another order to Rockauto, so I decided to check and clean the valve I already had. I possibly made a fatal mistake by using brake cleaner (chlorinated too!) to clean the unit. I learned after cleaning that brake cleaner can damage rubber and plastic components. Woops! At least I dried the unit extra well with compressed air before putting it back. The cleaning got a lot of gunk out of there, and I swear it actuated better after it. Once I learned about the brake cleaner bit, I went back to inspect the valve about a week later. It seemed to work okay. I applied a small bit of silicone grease to the o-ring to protect it some.
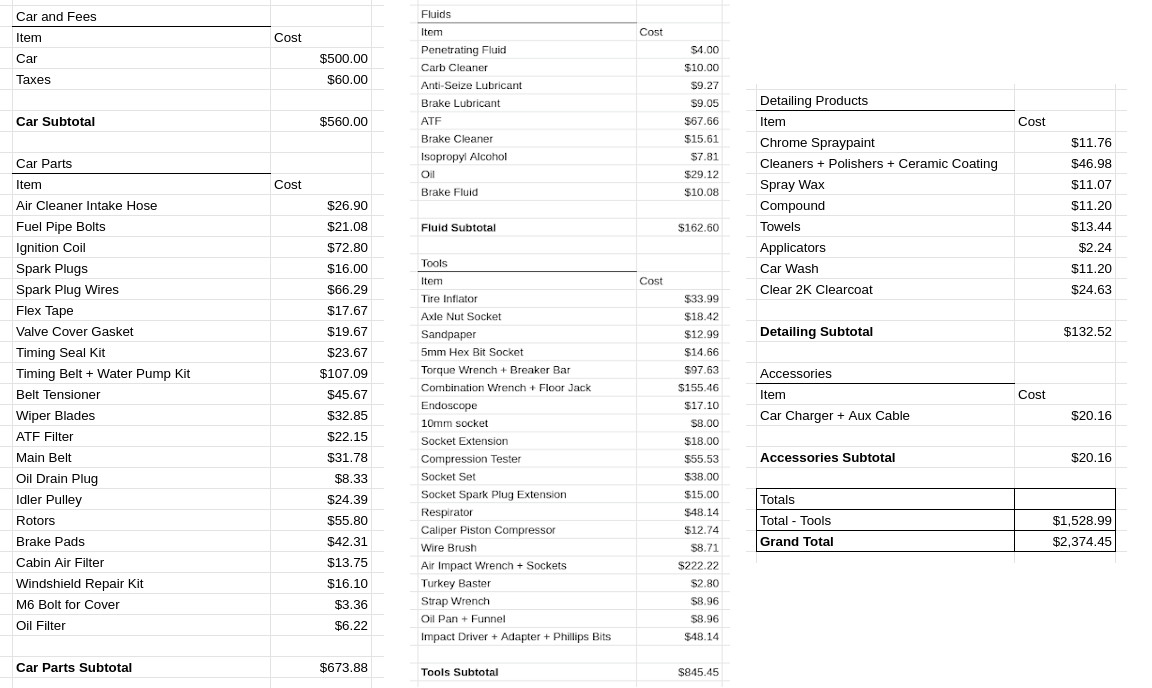
Lastly, I decided to do some accounting on the project. I didn’t have many tools before the project so I spent about $850 CAD on tools. $670 went towards parts, $160 towards fluids, $130 for detailing. In total I’ve spent a grand total $2.3k to get a functioning car with 251k km on it. Oh lord!


 LinkBack URL
 About LinkBacks


 Reply With Quote
