Welcome to Stumpy's in depth guide to changing out the stock stereo!
It is one of the best and relatively inexpensive upgrades to your user experience. The stock stereo barely moves the speakers and has no features what so ever. I aim to provide a visually rich guide to aid others in relieving their ears from poor sound quality and to ease the worries of complicated wiring schemes.
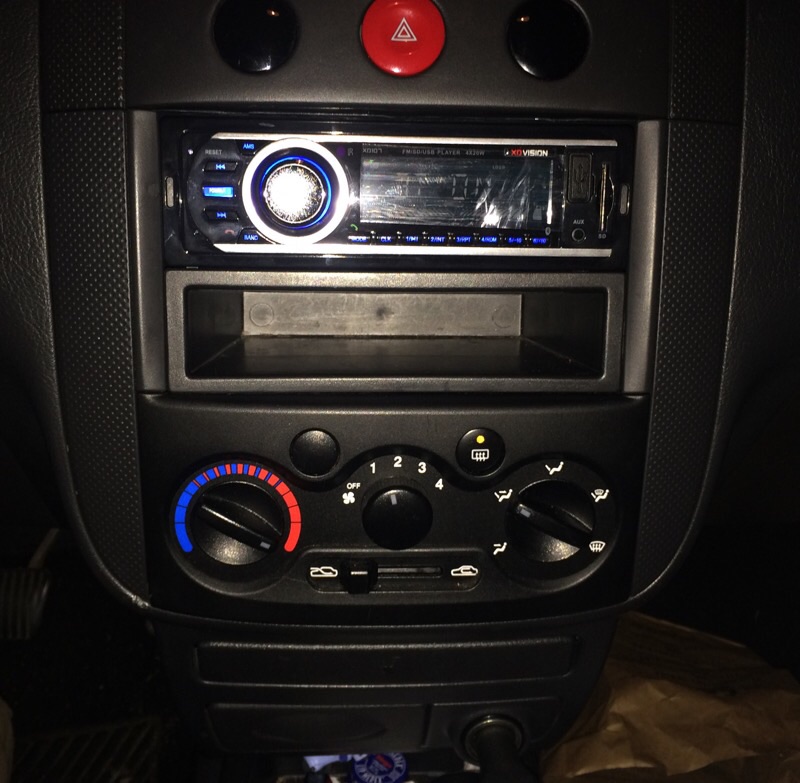
Let us look at what we have. The housing on my Aveo has the space for a double DIN, which means two 2" bays or one 4" bay. We see the stock, yucky, stereo and a little cargo bucket below it. Personally, I use the cargo bucket to my advantage so I want to keep it. That leaves me with a single slot to buy a radio for. I wanted Bluetooth in my stereo and an auxiliary input. No CD, no subs, nothing crazy. Not looking to make it an expensive job, but I want to do it right and have the features I want. Your install may be more complicated if you have additional features, especially during the wiring steps. I cannot help you with those complicated projects, I am no pro.
First, we pop off the trim from the sides. This is fairly easy on this model with only two clips holding it in place. I gently pried it from the bottom using a flat head screwdriver, but a trim tool will make quick work as well.
We see the side mounting bracket that holds the stereo and bucket in place. It is held on with four Phillips screws. Remove the big mounting screws and the whole thing slides out nice and easy.
At this point, the possibilities are endless as to what you want to fit in. Stereo, GPS, touch screen, tablet etc. I took, as I almost always do, the quick and easy route without "jerry-rigging" as they say. I unplugged the stereo and took the mounting screws out from it.
This is the stereo I chose. It was "stoopit" cheap at Walmart for around 22$. Being sold as of 12/19/15 as a holiday item. It ended up being leagues better than stock at 4 X 20watt and sounds pretty good with the stock speakers (yes I know its no Kenwood, Alpine etc. Let's be modest)
It doesn't come with mounting holes because it has a metal bracket and looks like it was designed to be paired with a crazy plastic mount kit (more money to waste). I bent the tabs back and slid the new stereo bracket off. Then it fit well in the side DIN bracket. At this point, look inside at the circuitry to make sure you can drill the stereo shell without hitting anything inside. With this model, there is plenty of room. Dry fit the whole assembly and see how the new stereo fits, making adjustments as needed. Once you figure out how the stereo will fit, replicate the position and use tape to hold it in place. Dry fit again to ensure a proper fit. Use self tapping screws and go right through the tape. Your stereo is fitted and ready for wiring.
My stereo, as should all stereos, provides a wiring harness to match the back of your new head unit. It does not match the stock male plug. This is the hardest part of this install. I do things cheap and quick but I am NOT willing to mess up my stock radio wiring harness by modifying or clipping the connector. I WILL spend the extra money to get the right connection to make this almost fool proof and I HIGHLY recommend you do the same.
I will be the the financial martyr for you all. I had to go to a specialty car audio place to even find out which adapter to use, let alone have it in hand within a timetable I can handle(now = more $$). I pass to you the part number and brand to match the stock male plug. Metra turbowire 70-8405. Make sure it is the female when shopping online and expect to spend at least $10 but not more than $20-25 anywhere online or in person. No stores had this on the shelf because it was used so rarely and bought even less. The absolute best part about this harness is that the colors match up to current wire color schemes and if they don't, the purpose of the wire is printed on the wire itself(suh-weeet).
I'm not going to go into the details on fastening the wires. If you get the right adapter harness, the colors match up and the plug matches up etc. If you don't want to do the job right, make it work on your own. Again, I am not a pro and I have never connected an external amp for subs. I had two wires extra that didn't need to get hooked up, yours may differ. Either way, I connected the wires together and electrical taped them, then taped the whole thing a few times so it wouldn't birdcage as I pushed it into the dash. Your harness is ready!
The assembly is so fast and easy. Plug in your new harness to the stock one and the back of your new stereo. Connect the antenna plug and turn your car in to test if it all works. It should, this is so basic if you spend the extra money for the right connector, it is almost foolproof. Turn the car off ,fit the stereo assembly into the dash and put the four screws back in. Pop the trim back on and you are done! Blast tunes as you zip away!


 LinkBack URL
 About LinkBacks

 Go-Kart
 Reply With Quote
