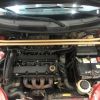
Hey forum, it has been a while.
Last time I went hard on here, I was developing a header for the Etec II. Well, it was quite cost prohibitive and the logistics of it are difficult, but not impossible. Combining the fact that I have overcome some challenges in my personal life (new baby), all of it was a little too much to handle at the time.
So what now? I decided to step up to the plate and deliver something instead of being all talk and no show. Here it is:
That is what I have developed for you.
"But wait Stumpy," you say.
"Doesn't that other race company make those already?" you say.
"Didn't FabricatorX make some of those?" you say.
Yes. Yes they do, yes he did. I believe my design to be better for a few reasons.
First, it is solid welded, no bolting up the main bar. Almost every factory OEM strut brace is solid and doesn't have the raised bushing bolt in main bar. The bushing will only act as a pivoting point, decreasing the true load transfer.
Second, I don't like the bulky mount raised bushing look. It works for some cars with more room around the strut tower, but the Aveo is crowded around there, with the bell shaped strut mount tops, ECU, coolant tank etc. Also, the double mounting points make sure this thing doesn't shift under cornering load.
I will be the first to admit, however, they are better fabricators than I am and probably has more experience etc. and would have a "cleaner" finish. I learned a lot doing this and probably could make it "cleaner" and faster.
That all being said, I WILL MAKE ONE FOR YOU~!!
That is right, you read correctly. I will make you a single piece to order. I will prime it and send it to you. Or paint it for a little extra. The cost is 120$ primed plus calculated shipping (varies so I cannot give you an exact amount). I will be able to bill you through PayPal, so it is secure and legit (no eBay fees & I will eat the PayPal fees). Once you pay, I will make the brace, probably about a week turnaround for it to be shipped. I live in CT, so you may also feel free to pick it up if you so choose.
Disclaimer: You will have to modify the ECU bracket and cut off a bolt in order to install. I also don't know if it works with the stock airbox, since I have a CAI, but it probably would not.
You could make this yourself if you really wanted to, I'll even show you how.
"But Stumpy" you say.
"I don't have a tube bender" you say.
Neither do I, friend. With this technique, I will show you how to make it so you can make one too!
Side note: If this is confusing ask questions. Don't be shy.
MAKING THE STUMPY SUPER STIFF STRUT BRACE:
-1" tubing, about 1/16 thick. You will need about 10'
-3/16" plate. 4" x 11"
Metal cutting (grinder / cutoff / drill bits)
Welder
Tape measure, marker, hammer
Sockets and extension
Flange head bolts, flange nuts (4 each)
Start by making a template. You can see the general shape of mine and the approximate dimensions of the plate I used. Make a template out of cardboard to mock up the two factory holes on either side of the strut tower and contour to fit around the bell shaped strut mount. Cut the holes and "install" the template to make sure the holes are right!
Trace the template onto the plate and cut it out. Drill the holes. I used 3/8" hole. I don't need to explain all that, but I will say make a pilot hole before going that big.
BIG SIDE NOTE: You can see that I didn't cut that triangle corner piece off the plate like how it is in the template. I left it on because I was still unsure where the bars would be able to land for clearance. It ended up being bad that I didn't cut them because when I started fabbing in place, I couldn't take the bar out. Cut the corners to make the shape like the cardboard template.
Next I did the tubing. The two lengths are 55" and 50". Cut them and deburr the cuts. Draw a straight line down the tube by sitting the tube on a flat surface, clamp it, and run the marker across the side (marker flat on table).
For the 55" rear bar- mark 12.5" in from each end, and 3 more marks 1" spacing towards the end (12.5",11.5" etc) for a total of 4 marks. Then, if you can, set the depth of your chop saw and cut all 8 lines to the same depth, making sure to cut without rotating the tube. Once you cut the lines, bend your tube!
For the 50" front bar- mark 8.5" from each end, 2 more marks 1" to the end total of 3 marks. Same thing with cut and bend.
Pro Tip: don't turn the tube around to cut the other side it doesn't work well. Just feed it straight to get the other side in position.
Now weld it back together and grind the welds smooth.
Now it is time to mock up the brace. Bolt in the plates, tightening the rear first. My towers had a little bow to them so I made sure to make process to it. Hold the forward bar up to the plates and mark where you need to cut off to have it be level to the plate. Hard to explain but I think you kid of get the gist of it. Cut it level and get happy with the fitment.
Tack it in place, take the bar out and weld it a little better but not fully just in case. Now you can mock up the rear bar and trim it too.
(yes I know the bar isn't welded in this pic I had to remake one of them. Lucky for you I can give you the finished recipe)
If you are happy with it, get to welding!
Continued in next post for more pictures!


 LinkBack URL
 About LinkBacks

 Go-Kart
 Reply With Quote